Test & Integration Guide
Overview
This is the page that opens when you click View Docs on the endpoint detail page. You can test API calls directly in the browser without any additional tools, and share it with collaborators so they can find everything they need for integration in one place.
Testing on this page is done in the sandbox environment only. It does not affect production data, so feel free to experiment.
The page has two tabs:
- Quick Start — Authenticate with an API key and test calls right away
- Guide — Integration reference for owners and collaborators (step-by-step guide, API endpoints, headers, field definitions, code examples, etc.)
How to get here
- Endpoint Detail right sidebar > View Docs button (Sandbox tab)
- Collaborators can also access it from their own dashboard after accepting the invitation
Endpoint info
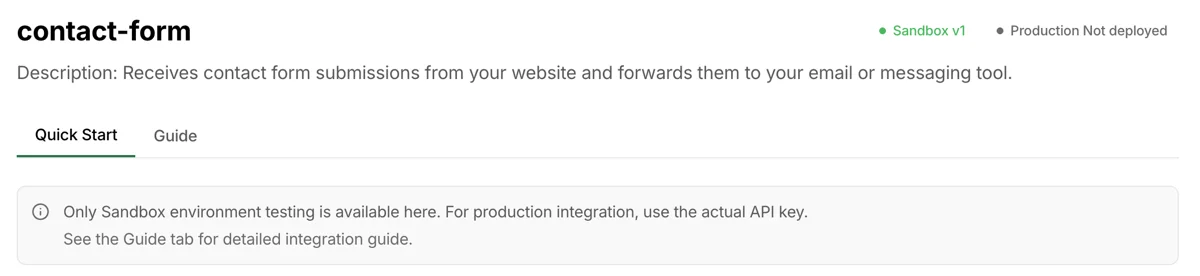
- The endpoint name and description are displayed
- Environment badge (Sandbox) and version info appear alongside
- Switch between the Quick Start / Guide tabs
Quick Start tab
Authentication
To start testing, you need to authenticate with an API key first.
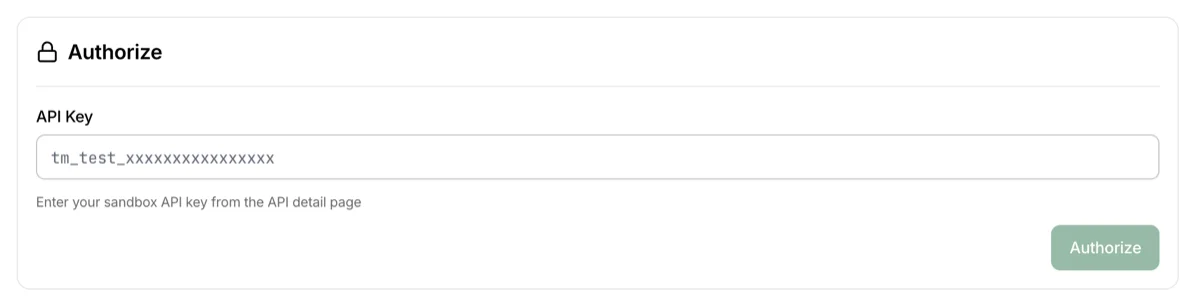
- Paste a sandbox key (starting with
tm_test_) into the input and clickAuthorize - Two types of keys can be used:
- Default API Key — When the owner tests directly
- Collaboration Key — When a collaborator tests with their own key

Once authenticated, the input disappears and a Logout button appears. To test with a different key, log out and authenticate again.
Try it out
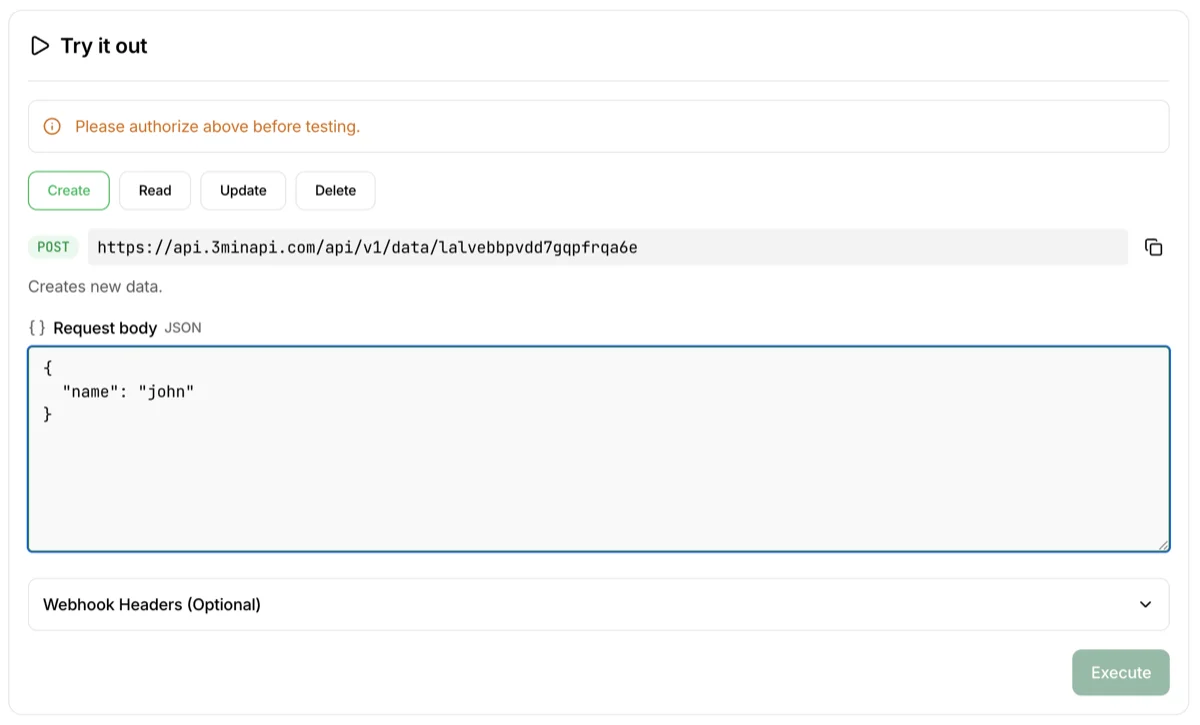
After authentication, the CRUD call execution area is activated. Select a method, enter the request body (JSON), and click Execute to see results immediately.
If you want to test the full flow at once, follow this order:
Full CRUD test guide
CREATE (POST) — Enter test JSON in the request body and execute. Copy the
idfrom the response — you'll need it for the next steps.READ — Single record (GET) — Paste the
idinto the Record ID field and execute. The full payload of that record is returned.READ — List (GET list) — Call GET without a Record ID to receive recent records in reverse chronological order. Use
limit(1–30, default 10) andcursorfor pagination — passpagination.next_cursorfrom the response as thecursorof the next call to fetch the next page.READ — Search (GET search) — Find records by a keyword inside the payload. Use
q(required, 3–200 chars) plus optionalstart/end(defaults to the last 30 days),limit, andcursor. Matching is case-insensitive substring with cursor pagination.READ — Poll (GET poll) — Fetch records created since your last poll, oldest first. The first call takes nothing (it subscribes from now on) or
since; every call after that sends the cursor from the previous response back.next_cursormeans a backlog remains — call again right away.poll_cursormeans you are caught up — save it and wait for the next cycle.UPDATE (PUT) — Enter the same
idand provide modified JSON in the request body. This is a full replacement, so include fields you want to keep as well as those you're changing.DELETE — Enter the same
idand execute. Try READ again afterward to confirm the record has been deleted.
Permission check: When testing with a collaboration key, only methods allowed by that key's permissions can be executed. Calling an unauthorized method returns a 403 error. Check permissions at Collaboration Keys > Permissions.
Collaborator webhook
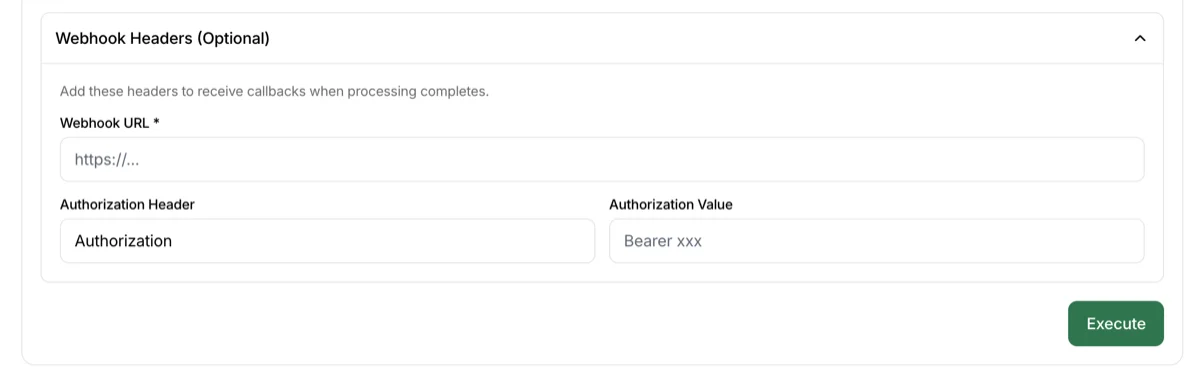
At the bottom of the Try it out section, there's a collapsible webhook settings area. This is separate from the webhook the owner configures in the dashboard — it's for the API caller to include webhook information in request headers so they can receive processing results at their specified URL. You can test these headers here.
- Operates independently from the owner webhook
- In actual integration, webhook headers are included directly in your API call code
- See the Guide tab's Webhook Setup section for detailed header names and implementation
Guide tab
The Guide tab is structured so both owners and collaborators can review the full integration flow and technical details in one place. Role-specific step guides are at the top, followed by technical reference.
Getting started — Owner
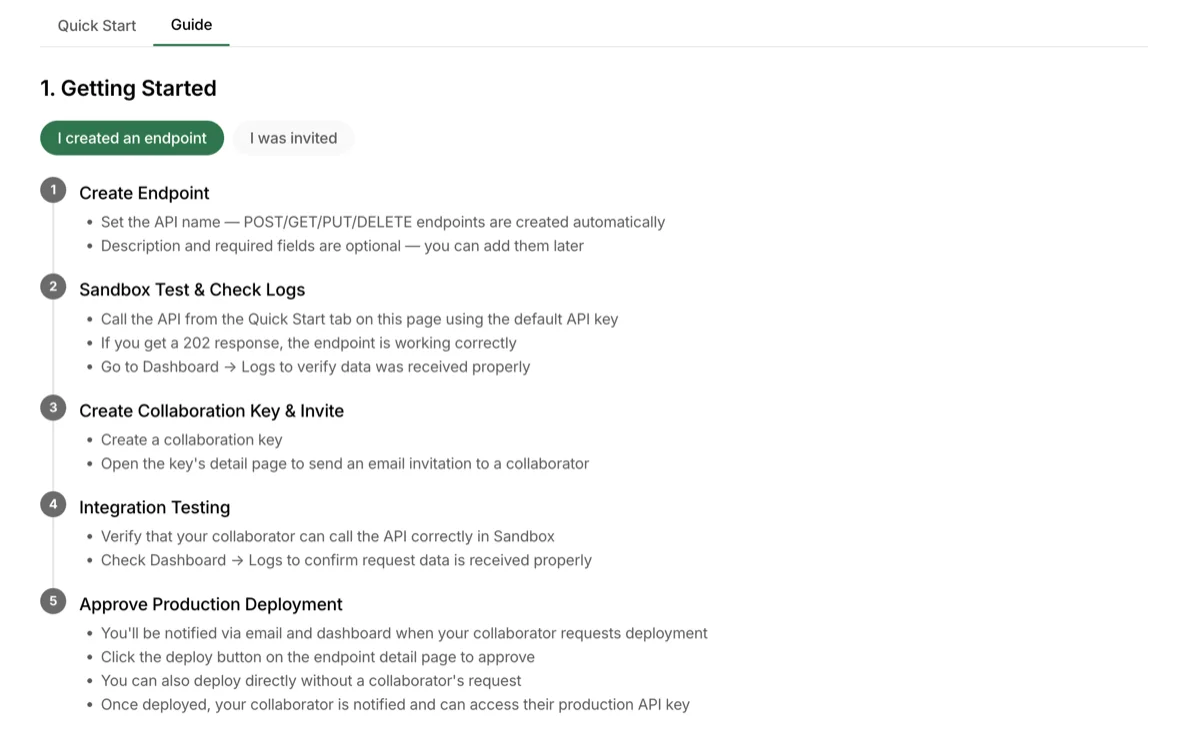
Select the Did you create an endpoint? tab to see the steps from the owner's perspective.
- Create endpoint — Just set an API name and CRUD is automatically created. Description and required fields can be added later
- Sandbox test and log check — Make a call with the default API key in the Quick Start tab, then verify data receipt in dashboard logs
- Create collaboration key and invite — Create a key and send email invitations from the detail page
- Integration test — Verify together that the collaborator is calling correctly in sandbox via logs
- Production deployment — Approve the collaborator's deploy request, or deploy directly. Collaborators are notified after deployment
Getting started — Collaborator
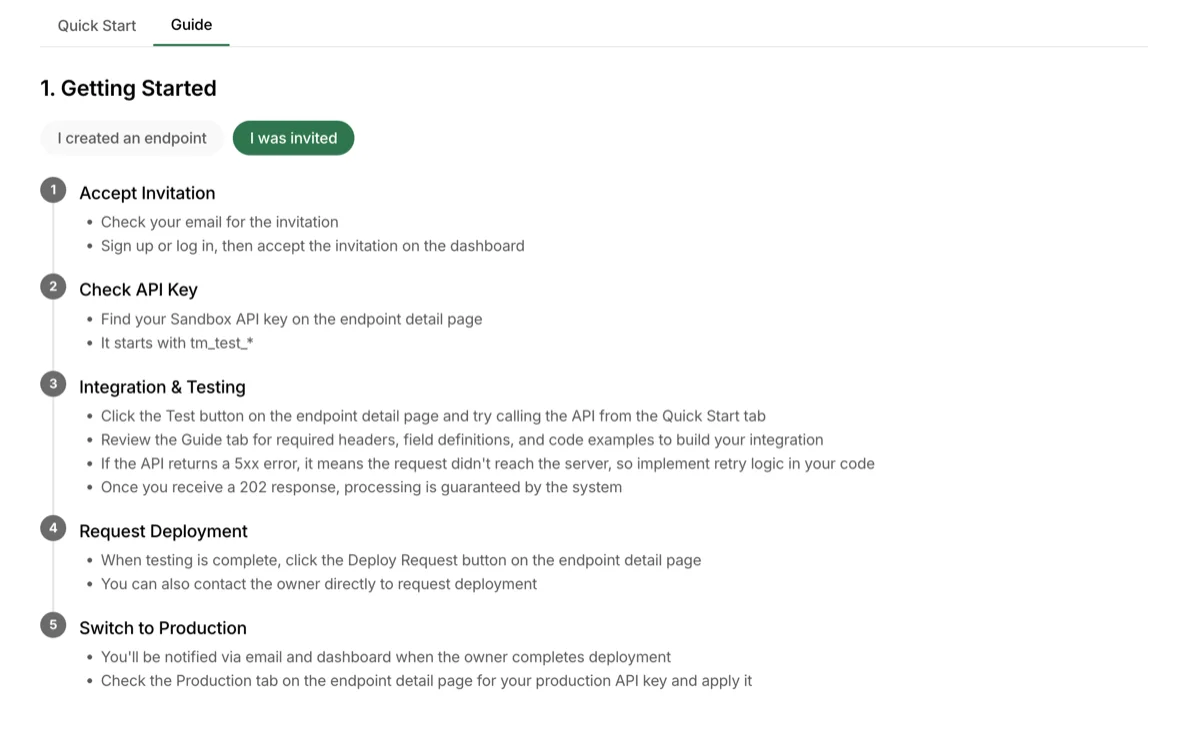
Select the Were you invited? tab to see the steps from the collaborator's perspective.
- Accept invitation — Check the invitation email and accept on the dashboard after logging in
- Check API key — Find your sandbox API key (
tm_test_) on the endpoint detail page - Integration and testing — Test calls in the Quick Start tab, and reference the Guide tab's technical info to develop your integration. If you receive a 202 response, processing is guaranteed by the system
- Request deployment — When testing is done, submit a deploy request from the endpoint detail page
- Switch to production — Once the owner completes deployment, you'll be notified. Check and apply the production API key (
tm_live_) from the Production tab
API Endpoints
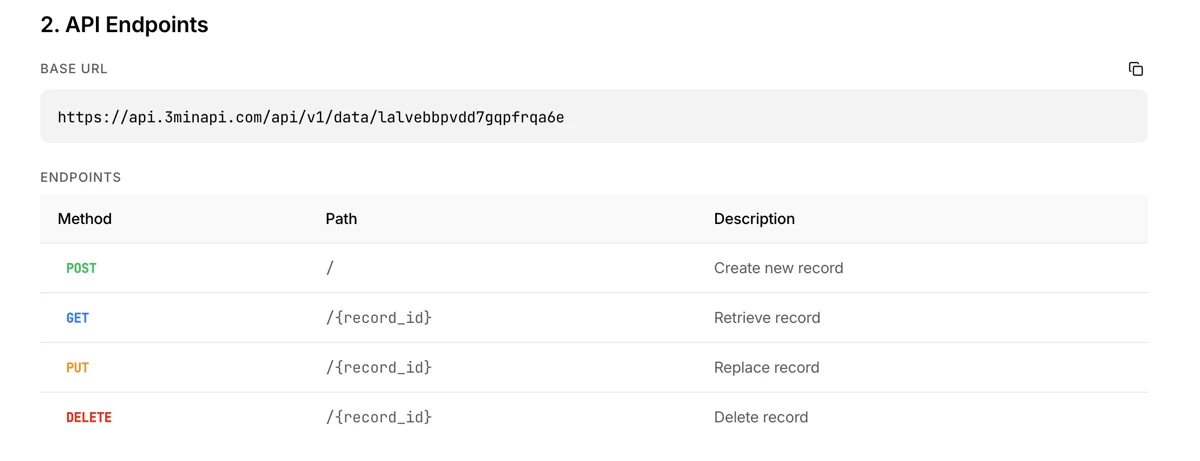
Shows the API paths and methods available for this endpoint. The following methods are automatically prepared when an endpoint is created.
| Method | Path | Description |
|---|---|---|
| POST | /api/v1/data/{slug} |
Create a new record |
| GET | /api/v1/data/{slug}/{record_id} |
Retrieve a record by ID |
| GET | /api/v1/data/{slug} |
List recent records (cursor pagination) |
| GET | /api/v1/data/{slug}/search |
Search records by payload text (q, optional start/end; min 3 chars, cursor-paginated) |
| GET | /api/v1/data/{slug}/poll |
Fetch records created since your last poll, oldest first (since or cursor, cursor-paginated) |
| PUT | /api/v1/data/{slug}/{record_id} |
Replace a record |
| DELETE | /api/v1/data/{slug}/{record_id} |
Delete a record |
{slug} is a unique identifier automatically assigned when the endpoint is created. You can see the actual value on this page.
The search call requires q (3–200 characters). start and end (YYYY-MM-DD or RFC 3339) are optional — when omitted, the last 30 days are used. There is no upper limit on the date range. Results are cursor-paginated (pagination.next_cursor is present when more pages exist). Matching is case-insensitive substring against the full payload, so numeric or JSON-key false positives can appear (e.g. searching 32 also matches 132). Search is governed by the same read permission as the single GET and the GET list.
The poll call walks records forward in created_at ASC order — the opposite of list and search. Send neither parameter to subscribe from now on, since (YYYY-MM-DD or RFC 3339, always UTC — 2026-08-28 means UTC midnight, not KST) to start from a point in time, or cursor to continue; sending since and cursor together is a 400. limit is 1–100 (default 100) and is not carried in the cursor, so resend it on every page. Every response holds exactly one of two cursors: next_cursor means a backlog remains — call again immediately; poll_cursor means you are caught up — save it and wait for the next cycle. The most recent ~60 seconds are held back, because created_at is stamped by the gateway while the row is inserted asynchronously through the queue — without that margin the watermark would advance past records still in flight. Those records arrive on a later poll: deferred, not lost. Retries and restarts can redeliver a record, so process idempotently on record id. Polling is governed by the same read permission as the single GET, the GET list, and the GET search.
API Keys
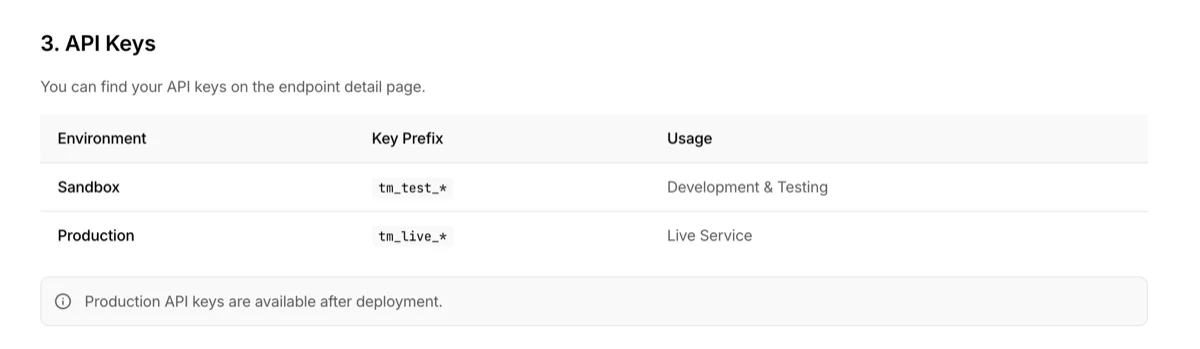
Key information for authentication when making API calls.
| Environment | Key prefix | Usage |
|---|---|---|
| Sandbox | tm_test_ |
Development and testing |
| Production | tm_live_ |
Live service |
Production API keys can be found on the endpoint detail page after deployment is complete. Before deployment, calls with production keys are rejected.
Request Headers
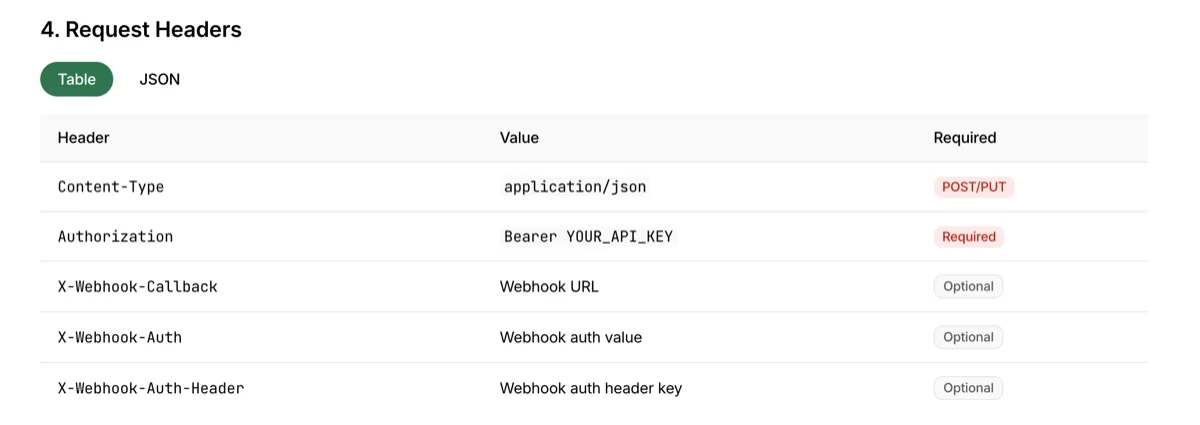
HTTP headers to include in API calls. Content-Type and Authorization are required; webhook headers are only added when needed.
| Header | Required | Description |
|---|---|---|
Content-Type |
Required | application/json (for POST/PUT) |
Authorization |
Required | Bearer {API_KEY} format |
X-Webhook-Callback |
Optional | URL to receive caller webhook |
X-Webhook-Auth |
Optional | Webhook auth value (e.g., Bearer token) |
X-Webhook-Auth-Header |
Optional | Webhook auth header key (default: Authorization) |
Request Body
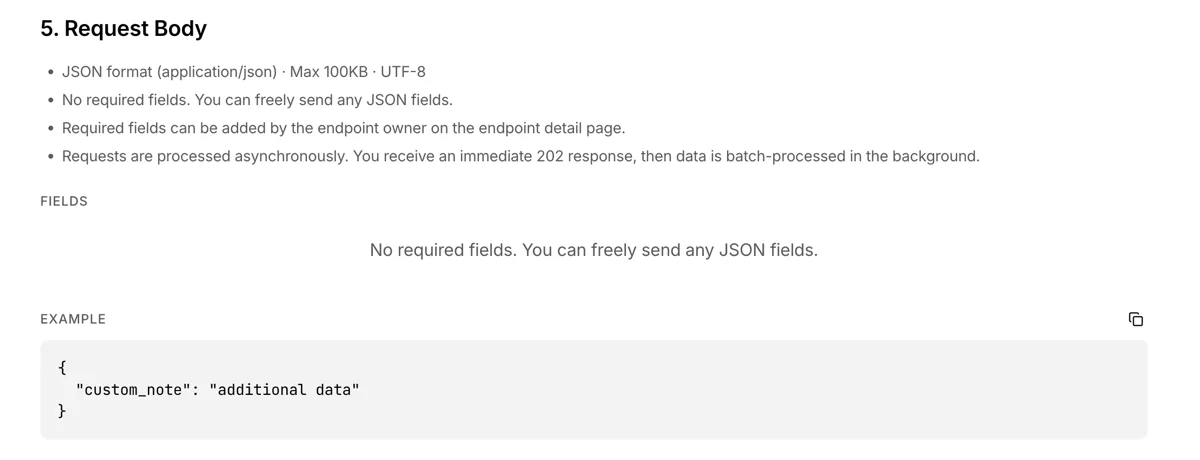
Information about the JSON body sent with POST/PUT requests.
- Format: JSON (
application/json) · Max 100KB · UTF-8 - If the owner has defined required fields, those fields must be included. Additional fields beyond the required ones can be sent freely
- If no required fields are defined, any JSON is accepted
- Requests are processed asynchronously. You receive a 202 response immediately, and the actual storage and webhook delivery happen in the background
Response Format
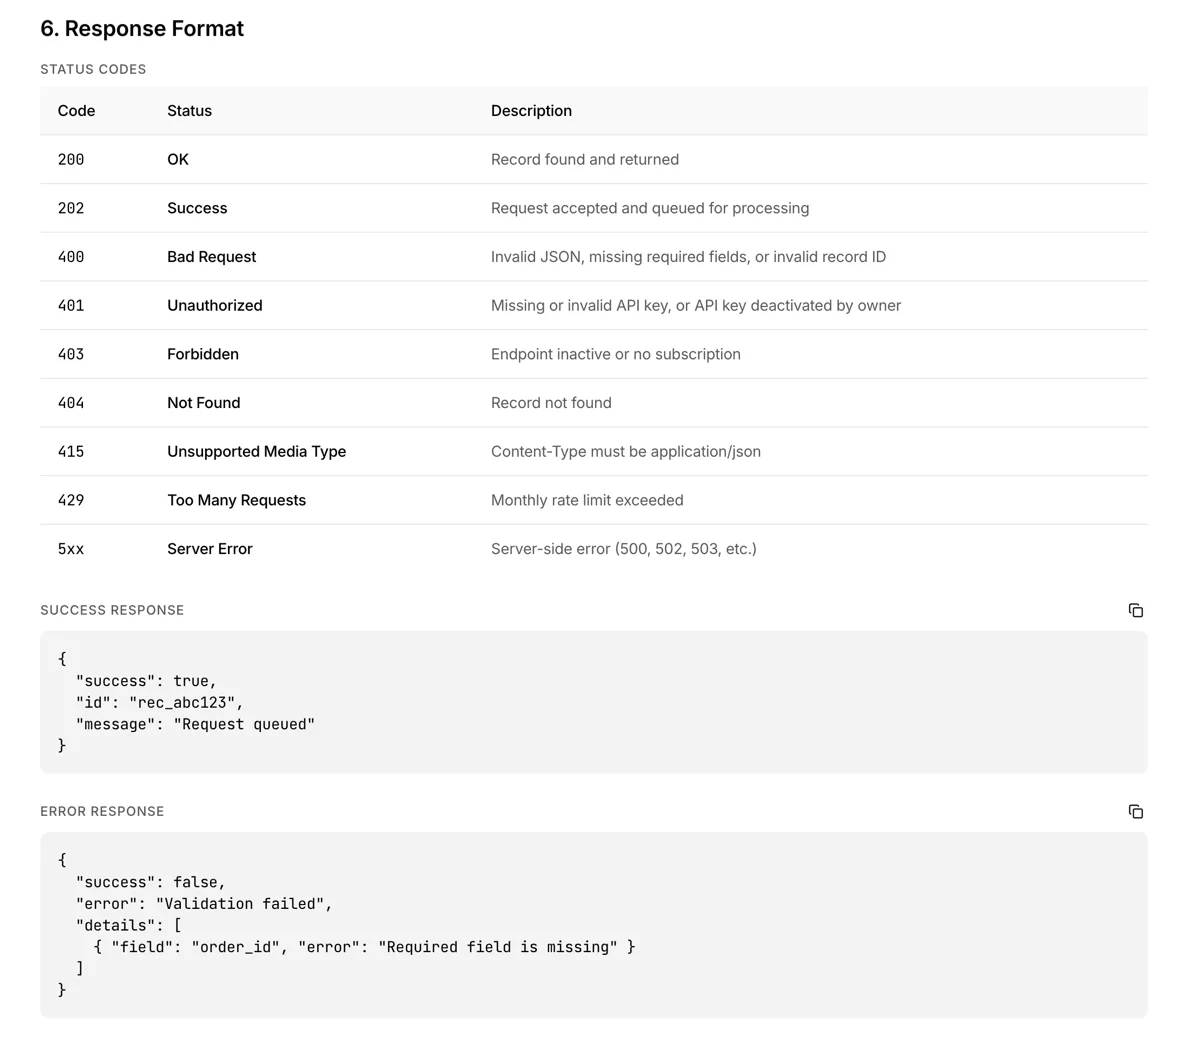
Shows success responses and error codes for each method.
Success responses:
- POST/PUT/DELETE →
202 Accepted(request accepted and queued) - GET (single) →
200 OK(record returned immediately) - GET (list) →
200 OK(paginated data +next_cursorwhen more pages exist) - GET (search) →
200 OK(paginated data +next_cursorwhen more pages exist) - GET (poll) →
200 OK(oldest-first data + exactly one ofnext_cursor/poll_cursor)
Error codes:
| Code | Status | Meaning |
|---|---|---|
| 400 | Bad Request | Invalid JSON, missing required fields, invalid record ID |
| 401 | Unauthorized | API key missing or invalid |
| 403 | Forbidden | Endpoint inactive, no subscription, or insufficient permissions |
| 413 | Payload Too Large | Request body exceeds 100KB limit |
| 415 | Unsupported Media Type | Content-Type is not application/json |
| 429 | Too Many Requests | Monthly usage limit exceeded |
| 5xx | Server Error | Temporary server error — implement retry logic |
If you receive a 5xx error, the request didn't reach the server. Implement retry logic in your code (e.g., 1s → 2s → 4s backoff). If you receive a 202 response, processing is guaranteed by the system.
Webhook Setup
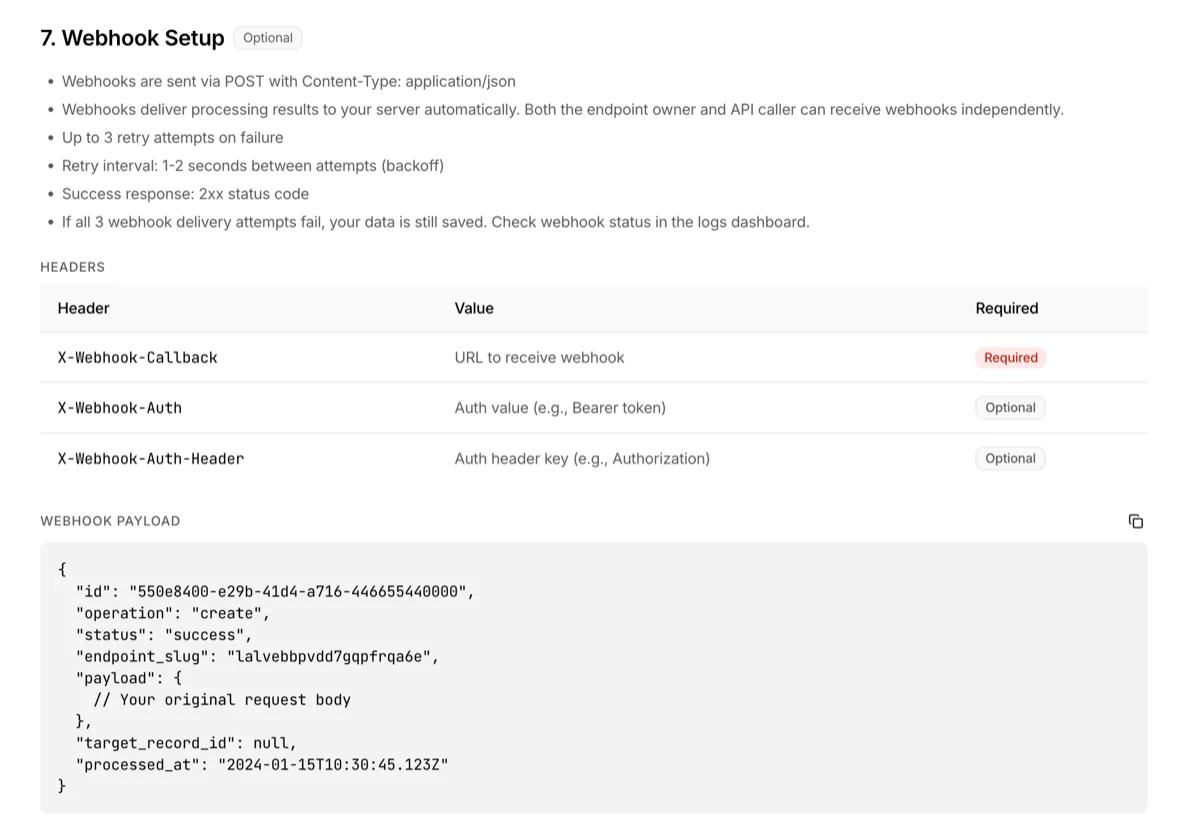
Instructions for setting up caller webhooks to automatically receive processing results. This operates separately and independently from the owner's dashboard webhook.
How to set up: Include the following headers in your API call.
| Header | Required | Description |
|---|---|---|
X-Webhook-Callback |
Required | URL to receive webhooks |
X-Webhook-Auth |
Optional | Auth value (e.g., Bearer token) |
X-Webhook-Auth-Header |
Optional | Auth header key (default: Authorization) |
Headers we send with every webhook:
| Header | Description |
|---|---|
User-Agent |
3minapi-Webhook/1.0 (+https://3minapi.com/guide/api-docs). Match on the prefix 3minapi-Webhook/ when you allowlist us in a firewall |
X-3minapi-Record-Id |
The record ID. Identical across every delivery attempt — use it to detect duplicates |
X-3minapi-Delivery-Attempt |
Attempt number, starting at 1 |
webhook-id |
Record ID — the same value as X-3minapi-Record-Id |
webhook-timestamp |
When we signed (unix seconds). Regenerated on every attempt |
webhook-signature |
HMAC-SHA256 signature. Two arrive while a secret is being replaced |
Receiver contract:
- Return a 2xx within 15 seconds. Hand heavy work off to your own queue and respond immediately
- A 2xx means "I received it", not "it succeeded". Return 2xx even when your own processing fails — a rejected upstream call, a validation error on your side, an order you cannot fulfil — and record that failure in your own system. Keep 5xx for what it actually means: your receiver, or something it depends on, is temporarily down and a later delivery of the same record could succeed. A 5xx makes us redeliver that record on the retry schedule below, so your receiver runs the same work every time
- The same
X-3minapi-Record-Idmay arrive more than once. Use it to decide whether you have already handled the record
Retry policy:
- Success criteria: any 2xx status code — it only confirms the delivery was received, not that your processing succeeded
- Production: 6 attempts total — the first delivery plus 5 retries at 30s, 2m, 10m, 1h, 4h (about 5 hours). Sandbox: 4 attempts total — the first delivery plus 3 retries at 30s, 2m, 10m (about 12 minutes)
- Retried: 5xx (except 501/505), 429, timeouts, connection errors. A
Retry-Afteron a 429 is honored only as a request to wait longer — it never shortens the default gap, and values over 4 hours are ignored - Not retried: any 4xx other than 429 — including 409, which we read as "the receiver already has it". Fix the setting and the next call will go through
- Even if every attempt fails, the record is still stored — for the retention window (production at least 60 days, sandbox 30), so you can pull it later with the polling endpoint. Failed and in-flight deliveries appear under Webhook delivery on the logs screen, down to the response body and every attempt
- Once we give up on a delivery — retries exhausted, or a permanent response that is never retried — we email the endpoint owner — on every plan, Free included, but only in production and only for the owner webhook, at most one message per endpoint per day. There is no follow-up and no recovery notice. Collaborator webhook failures are never emailed, because the endpoint owner cannot change that URL
Verifying the webhook signature
Every webhook we send carries an HMAC-SHA256 signature, so you can confirm the request really came from 3Min API and was not altered along the way.
Verification is optional — if you already receive webhooks, they keep working with no changes. Turning it on protects you from someone who learned your receiving URL sending forged requests, which could make your server discard a genuine delivery as "already handled".
This is not encryption. The body still goes out in plain text exactly as before. What changes is that a fingerprint proving "this body has not changed by a single character since it left 3Min API" is attached in a header.
The fingerprint is built from three pieces joined together.
signed content = "{webhook-id}.{webhook-timestamp}.{raw request body}"
key            = the secret with whsec_ removed, base64-decoded
signature      = base64( HMAC-SHA256(key, signed content) )
Each piece blocks something different.
| Piece | What it blocks |
|---|---|
| Request body | Swapping the contents in transit |
| webhook-timestamp | Replaying a genuine request captured earlier |
| webhook-id | Attaching someone else's record id to make you discard a real delivery as "already handled" |
Where the secret lives: Dashboard > endpoint detail > Webhook Signing Secret. Sandbox and production have separate secrets.
Verify with a library (recommended)
We follow the Standard Webhooks spec exactly, so an official library reduces this to a few lines.
| Language | Package |
|---|---|
| Node.js / TypeScript | standardwebhooks (npm) |
| Python | standardwebhooks (pip) |
| PHP | standard-webhooks/standard-webhooks (composer) |
| Go | github.com/standard-webhooks/standard-webhooks/libraries/go |
| Ruby | standardwebhooks (gem) |
| Java / Kotlin | com.standardwebhooks:standardwebhooks |
| C# | StandardWebhooks (NuGet) |
| Rust | standardwebhooks (crates.io) |
| Elixir | standard_webhooks (hex) |
// npm i standardwebhooks
import { Webhook } from 'standardwebhooks';
import express from 'express';

const app = express();
// The signature covers the exact bytes we sent.
// Parsing the JSON and serializing it again always fails.
app.post('/webhook', express.raw({ type: 'application/json' }), (req, res) => {
	const wh = new Webhook(process.env.WEBHOOK_SIGNING_SECRET.replace('whsec_', ''));
	try {
		const payload = wh.verify(req.body, {
			'webhook-id': req.header('webhook-id'),
			'webhook-timestamp': req.header('webhook-timestamp'),
			'webhook-signature': req.header('webhook-signature')
		});
		// Verified — process the payload
		res.sendStatus(200);
	} catch {
		res.sendStatus(401);
	}
});
Implementing it yourself
- Strip the
whsec_prefix from the secret and base64-decode the rest to get the key bytes - Check that
webhook-timestampis within ±5 minutes of now (blocks replayed requests) - Compute
base64(HMAC_SHA256(key, "{webhook-id}.{webhook-timestamp}.{raw body}")) - Split
webhook-signatureon spaces and accept if any entry starting withv1,matches
Watch out for
- Sign the raw bytes. Parsing the JSON and re-serializing it changes key order and whitespace, and verification then fails every time. Use
express.rawin Express,request.get_data()in Flask,file_get_contents('php://input')in PHP - There may be more than one signature. Two arrive while a secret is being replaced, so rejecting after checking only the first would refuse everything during the changeover
- Ignore entries that are not
v1,. That keeps your code working if another version is added later - Do not compare with
==. Use a constant-time comparison:crypto.timingSafeEqual(Node),hmac.compare_digest(Python),hash_equals(PHP)
Replacing the secret
Only the endpoint owner can reissue a secret, and it is what you do when one has leaked — not a value to rotate on a schedule. For 24 hours afterwards both the new and the previous signature are sent, so you can update your receiving server at any point in that window without losing a delivery. After 24 hours only the new signature goes out.
If you receive webhooks as a collaborator, you can view the secret — your webhook is signed with the same one. Only reissuing is owner-only.
Code Examples
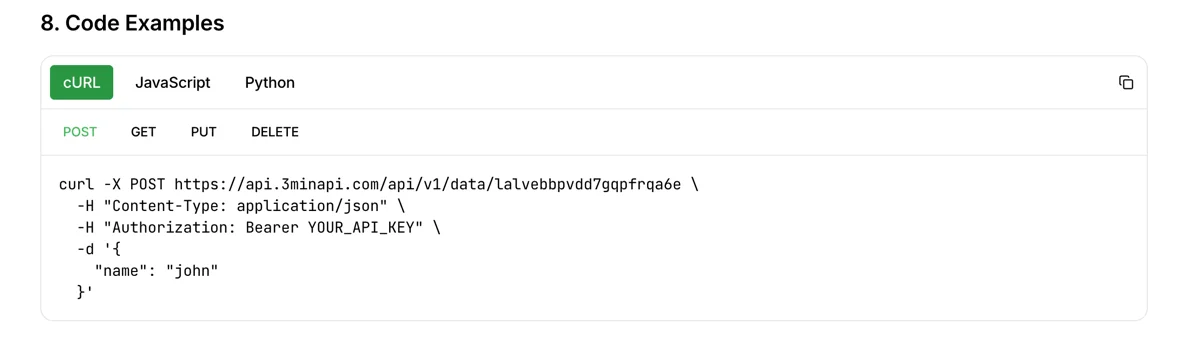
API call code samples are provided in major languages including curl, JavaScript, and Python. Switch tabs to see examples for each language. The actual endpoint URL and required headers are pre-filled, so you can copy and use them right away.
API Reference Tab
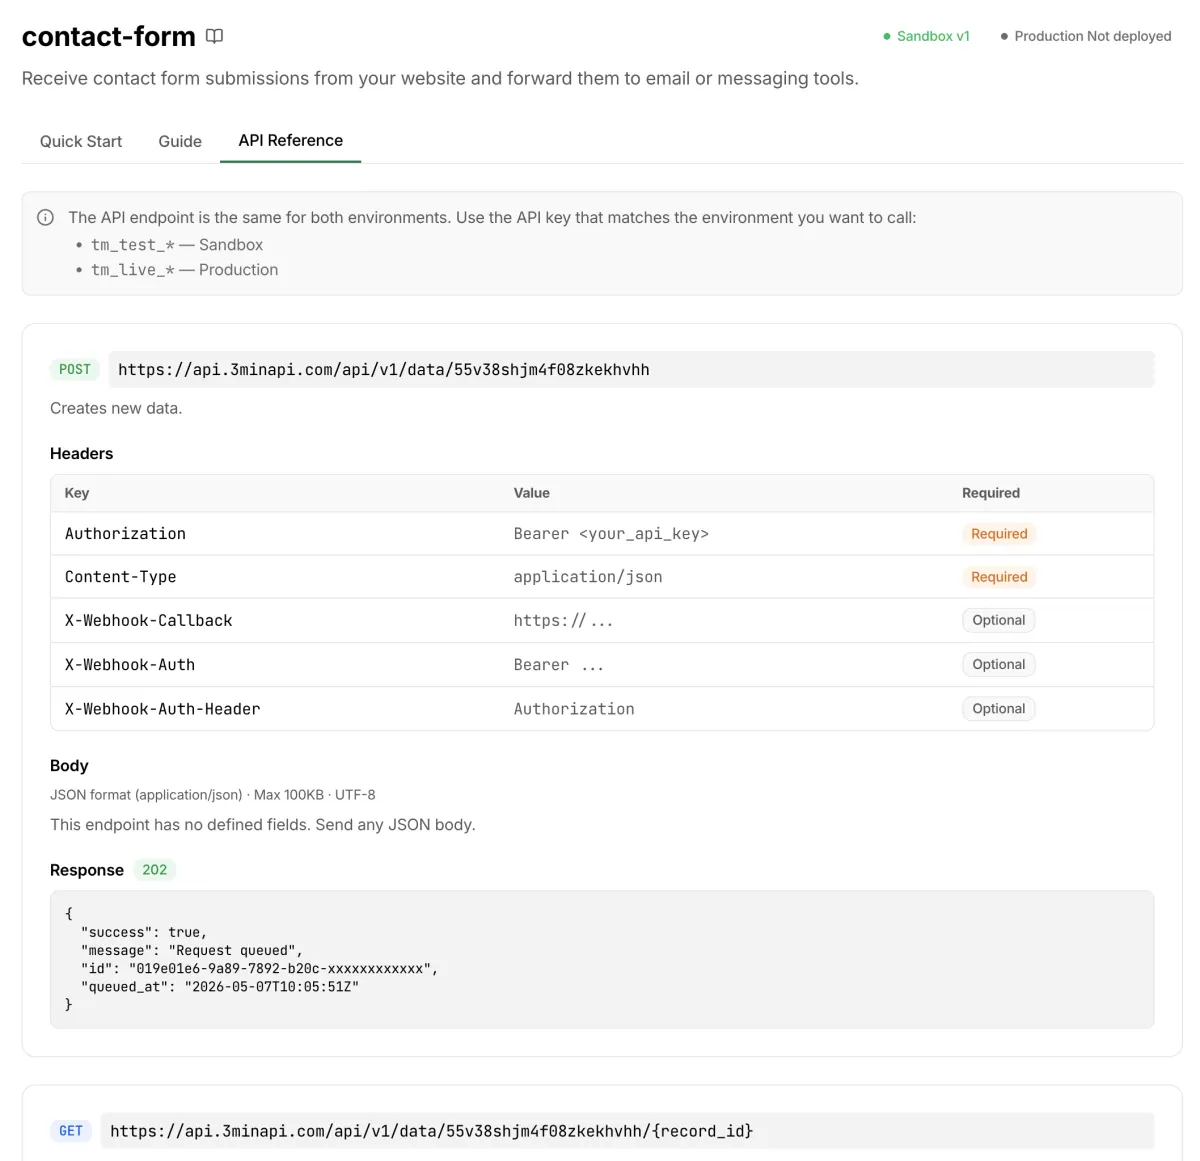
A tab that lays out this endpoint's specification in an OpenAPI-style overview. Each method card includes the request URL, headers, path/query parameters, request body schema, and response examples — so you can grasp the integration spec from this page alone, without external tools.
- If the Quick Start tab is for "calling and verifying directly," the API Reference tab is for "reading the spec and writing integration code"
- POST / GET (single) / GET (list) / GET (search) / GET (poll) / PUT / DELETE are split into separate cards, making it easy to compare differences at a glance
- Response examples use the same JSON structure as actual responses — you can drop them straight into your client's type definitions
Troubleshooting
- Nothing happens when I click Authorize: Check that the API key starts with
tm_test_(sandbox key). Production keys (tm_live_) cannot be used on this page - I lost the ID after CREATE: Call CREATE again to generate a new record and continue testing. If you need the previous record's ID, check the call history on the Logs page in the dashboard
- Getting 403 errors: The collaboration key you're using may not have permission for that method. Check at Collaboration Keys > Permissions
- Webhook isn't arriving: The webhook server must respond within 15 seconds. Check that it's publicly accessible and uses HTTPS. Platforms like Discord and Slack have rate limits — if too many webhooks fire in a short time, some may be blocked